Tool Mentor: Viewing the History of a Defect Using Rational ClearQuest®
Purpose
This tool mentor describes how the ClearQuest administrator can set up the ClearQuest defect form to include a History control that enables ClearQuest users to view and track the history of defects.
Related Rational Unified Process activities:
- Activity: Establish Project CM Policies, the step entitled Define Configuration Status Reporting Requirements
- Activity: Report on Configuration Status
Overview
Records move through a lifecycle, from submission toward resolution. In ClearQuest, each stage in this lifecycle is a "state", and each movement from one state to another is called a "state transition".
See ClearQuest Designer Help > Contents > Getting started with ClearQuest Designer > ClearQuest concepts > Improving the software lifecycle process with ClearQuest.
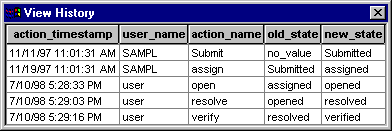
Within the ClearQuest client, you can view the history of a record. This history of a record includes the date actions occurred (such as moving to the next state or making a modification), the user name, the action name, the old state, and the new state.
See ClearQuest Designer Help > Contents > Working with record forms > Editing forms > Form control reference > History control.
Tool Steps for Viewing the History of a Defect 
The ClearQuest administrator can customize the ClearQuest schema to display the history of records.
See ClearQuest Designer Help > Contents > Working with schemas > Understanding schemas.
The View History command displays the changes in the state of a record and the dates on which the changes occurred. The contents of the View History dialog are read-only.
To view the history of a record, a user performs these steps:
- Run a query that includes the record.
- In the Result set tab, select the record.
- From the menu bar, choose View > History.
- To close the dialog, click
 .
.
Tool Steps for adding a History Control to ClearQuest’s record form 
ClearQuest Designer enables the ClearQuest administrator to create customized forms for submitting, viewing, and modifying records.
See ClearQuest Designer Help > Contents > Working with record forms > Understanding forms and controls
The ClearQuest administrator can include a history control on a form to display the state transitions of the record. These are the main steps:
1. Check out the schema. 
See ClearQuest Designer Help > Contents > Working with schemas > Checking out a schema.
2. Add a history control to the form. 
See ClearQuest Designer Help > Contents > Working with record forms > Editing forms > Adding controls to a form.
3. Check in the schema. 
See ClearQuest Designer Help > Contents > Working with schemas > Checking in a schema.
See ClearQuest Designer Help > Contents > Working with schemas > Validating schema changes.
4. Upgrade the databases. 
See ClearQuest Designer Help > Contents > Working with databases > Upgrading an existing database.
